Configuration
This section is dedicated to the configuration of Stay In Tarkov. If you haven’t installed Stay In Tarkov yet, click here.
Network Configuration
Follow this section if you’re planning to be the coop game host (server). At least one person in your group needs to follow this process to be able to play coop together. The person with the best computer and network performance should be the host for a better experience. Don’t let the lad with 10kbps internet host please.
UPnP
Note
UPnP (Universal Plug and Play) is the preferred method for server hosting as it supports automagically opening the ports that SIT needs while they are needed. However this only works for competent routers (looking at you USA). If you have issues with this please follow the Port Forwarding guide below for manually opening the required ports for Stay In Tarkov.
If you are using UPnP, skip to HTTP JSON Configuration to prep the server
Port forwarding
Note
Port forwarding is the process of opening a port on your external IP address and redirect the traffic to a specific device. The process is different for all router models. Therefore, we cannot provide a step-by-step tutorial for port forwarding.
If you are unsure how to port forward, google “YOUR_ROUTER_MODEL port forward” or contact your Internet Service Provider.
An example has been provided below but we cannot support you on this because every router is wildly different so please try to find instructions for your specific router.
Here is a quick example on how to port forward with a Virgin Media Superhub 3 (UK)
Open
cmdand typeipconfigFind
Default Gateway:it should have an IP similar to192.168.0.1. Also note down your local IPIPv4 AddressOpen your web browser and type the
Default GatewayIP into the URL bar (Not the search bar)There may be a login page there, put in the login details so you can get to the main dashboard
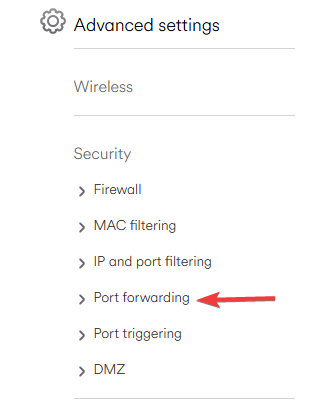
You will need to look for a tab called “Port Forwarding”. It may be under some advanced settings or security tab
Port Forward Setting Location
Once in there you should be able to open certain ports to certain IPs. This is where the
IPv4 Addresscomes inOpen ports 6969 to 6972, making sure to include those two as well, so 4 total ports. Some routers can port a range, if you can’t you’ll have to do them 1 by 1
Port Forward Screen and Set-up
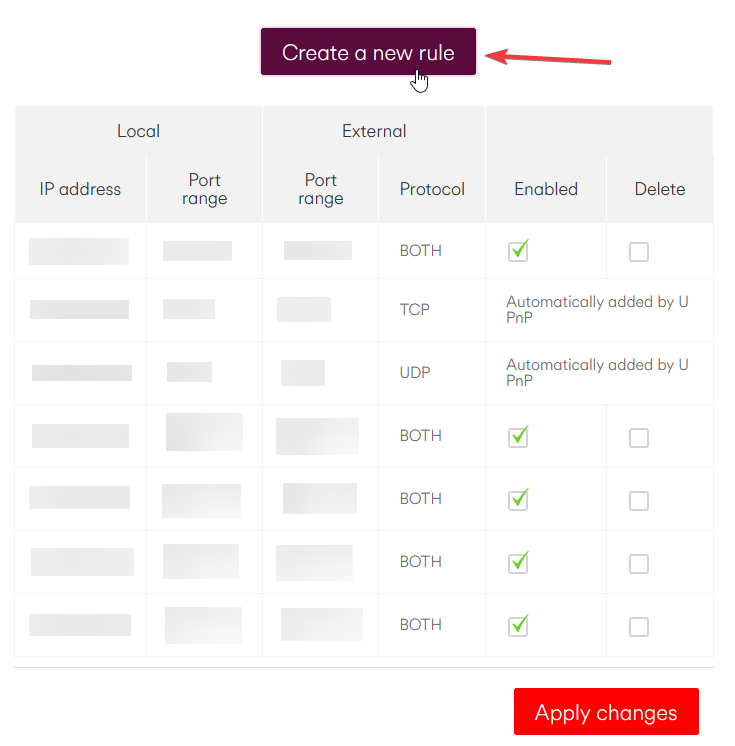
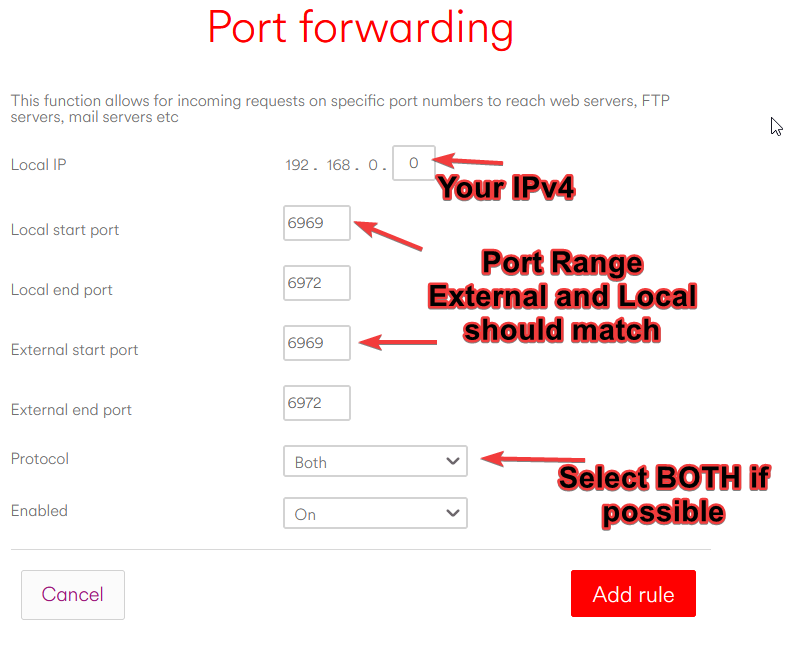
Make sure to use the “Both” option for Protocal if you can, otherwise you will need to do it twice, for both UDP and TCP
Once you save that those ports should now be open, and pointing traffic to your PC
Once you have completed these steps go here to configure the server to use these ports
Warning
Not all Internet Service Provider allows port forwarding. Sometimes port forwarding is blocked at the provider level or at the router level. In any case, the person able to port forward should be the host, provided their computer and network is capable.
If that is the case, you may have to use a VPN (Virtual Private Network) like Hamachi, Radmin or ZeroTier to allow people to connect however these may come with performance hits to players ping due to how they work. Port fowarding is the prefered method.
Virtual Private Network (VPN)
Note
Virtual private network such as Hamachi, Radmin or ZeroTier allows to create an internet-based “local” network. All traffic will be transmitted through the internet and redirected to a virtual network adapter which acts as a local network. This is useful for those which are unable to port forward. However, performance is not as good as port forwarding because traffic must go through a third party service.
If you need help setting these up a basic guide will be provided however we cannot help with issues coming from using these, so it may be best to look up a guide on how to use them beforehand.
Warning
We do not recommend using VPN to play Stay In Tarkov because they are known to have rate limitations and hinder network performance and stability. SIT is not well optimized and transmit a lot of data to synchronize information between players.
Use at your own risk.
Hamachi Configuration
Install hamachi from their offical site here Hamachi
Click the power button, it should ask you to log in, either log in or register an account to continue
If you are joining a server, join the hosts Hamachi network by pressing “Join an Existing Network” and enter the ID and Password
If you are hosting the server, press “Create a New Network”, then give it a name and password, give this to everyone you are playing with
Once you are all in the network, make sure everyones light is green, if not, look up a guide to fix it, we CANNOT help with this.
If everyone is connected and with green light, go HTTP JSON Config to setup the server to use the VPN
Radmin Configuration
Install Radmin from their offical site here Radmin
Once installed, make sure the power button icon says “On” and has an IP below your Computer Name. We cannot help with errors on this
If you are joining a server, join the hosts Radmin network by pressing “Join Network” and enter the ID and Password
If you are hosting the server, press “Create Network”, then give it a name and password, give this to everyone you are playing with
If the bar is green, the connection has been successful and you’re ready to continue, if not, then you’ll need to look up your issue as we can’t help
Once this has been done, head to HTTP JSON Config to setup the server to use the VPN
HTTP JSON file configuration
Open
SIT\Server\Aki_Data\Server\configs\http.jsonwith your preferred text text editor.Locate the “ip” parameter. You should see a default value of “127.0.0.1”.
Change “127.0.0.1” with
0.0.0.0. (Only change from0.0.0.0if you know what you’re doing)Save your changes and close the text editor.
Once you have done this, head here and follow the Server steps to see how to launch and join the server
Firewall Configuration
Note
This section is about configuring your Windows firewall to allow the clients to connect to the server through your PC, although you have forwarded the ports your PC itself my still reject the connections because it hasn’t been configured to allow them, the below section will detail how to do that if the server hasn’t already asked to be allowed through
Windows Firewall Guide
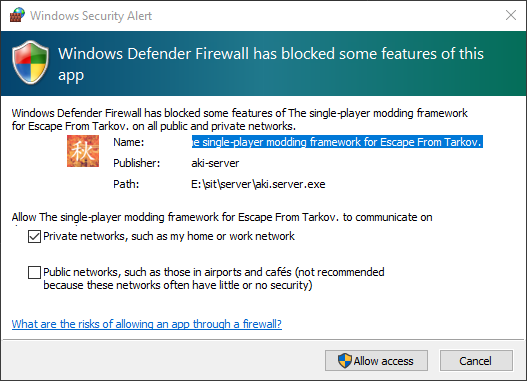
Open windows search and type “Allow an app”, this should show you the “Allow an app through Windows Firewall”, click it
Click “Change Settings”
Click “Allow Antother App”
Click “Browse” and navigate to where your
Aki.Server.exeisSelect it and click “Add”
Make sure both public and private are ticked
That should be Aki allowed through your windows firewall, and your server set-up should now be finished
Allowing an App Through the Firewall
General Configuration
Below are steps for configuring both the Stay In Tarkov client and the Stay In Tarkov Server, this have been split into catagories for your pleasure convience.
Client Side Config
Note
The configs for your client are located in SIT\Game\BepInEx\config\com.stayintarkov.cfg. You may want to use a text editor that isn’t
the built in notepad, something like VSCode, or at least Notepad++
These settings will only take effect if the person that has modified them is hosting the raid, so settings like EnableAISpawnWaveSystem
will only take effect if the person that modified them hosts.
Warning
DO NOT edit any of the Enabled options as they are for debug purposes and SHOULD NOT be modified in any way.
Config Option |
Values |
Default |
(Description* |
PlayerStateTickRateInMS |
true/false |
333 |
For setting the client drones to spawn on the server, for debugging use only |
ShowDronesOnServer |
150-666 |
false |
TCP Only: The rate at which Player States will attempt to be synchronized. ONLY MODIFY IF YOU KNOW WHAT YOU ARE DOING |
HeadshotsAlwaysKill |
true/false |
false |
Enable to make headshots actually work, no more tanking definite kills! |
ShowFeed |
true/false |
true |
Enable the feed on the bottom right of the screen which shows player/bot spawns, kills, etc. DOES NOT WORK RIGHT NOW, WAS CAUSING ISSUES |
AllPlayersSpawnTogether |
true/false |
true |
Will decide if all players spawn at the same spawn point or not |
ArenaMode |
true/false |
false |
Currently a DEBUG option. DO NOT TOUCH |
EnableAISpawnWaveSystem |
true/false |
true |
Toggles the AI spawn wave system, if false, no AI will spawn, useful for testing PvP aspects |
ForceHighPingMode |
true/false |
false |
Forces the High Ping Mode which allows some actions to not round-trip. This may be useful if you have large input lag ONLY MODIFY IF YOU KNOW WHAT YOU ARE DOING |
WaitingTimeBeforeStart |
0-600 |
120 |
Time in seconds to wait for players before starting the game automatically |
ShowSITStatistics |
true/false |
true |
Enable the SIT statistics on the top left of the screen which shows ping, player count, etc. |
ShowPing |
true/false |
true |
Enables the ping display in the top left |
ShowPlayerList |
true/false |
false |
Enable to show player list - For Debugging |
SITPort |
0-65535 |
6970 |
SIT TCP/Websocket Port ONLY MODIFY IF YOU KNOW WHAT YOU ARE DOING |
SITNatHelperPort |
0-65535 |
6971 |
SIT Nat Helper Port ONLY MODIFY IF YOU KNOW WHAT YOU ARE DOING |
Language |
Language Option |
English |
Changes SIT Localisation languages |
EnableSITVersionLabel |
true/false |
true |
Enables the SIT version in the bottom right, please leave this on, makes our life 10x Easier |
EnableHealthPatches |
true/false |
true |
Not completley surem of the purpose for this one, do not touch please |
EnableAdditionalAmmoUIDescriptions |
true/false |
true |
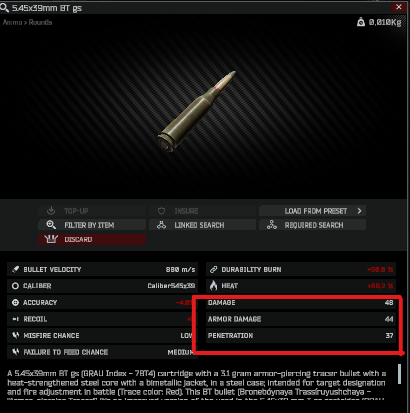
Enables the extra info about ammo in the information tab, only disable if you enjoy spreadsheets. |
Additional Ammo UI Example
Server Side Config
Note
The configs for your client are located in SIT\Server\user\mods\SITCoop\config\SITConfig.json. You may want to use a text editor that isn’t
the built in notepad, something like VSCode, or at least Notepad++
These settings are changed on the Aki server config, so they affect every player on the server, wether they host the raid or are just a client.
Config Option |
Values |
Default |
Description |
runAzureWebAppHelper |
true/false |
false |
IDK |
openAllExfils |
true/false |
false |
This setting will enable or disable all Exfils being avalible for use |
showPlayerNameTags |
true/false |
false |
This will enable the players name tags above their head, will make Friendly Fire Harder (Coward) |
showPlayerNameTagsOnlyWhenVisible |
true/false |
false |
Setting this to true will make name tags show up all the time, instead of just when the player is in view |